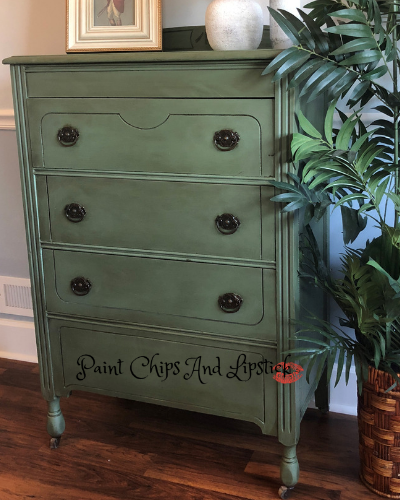
Vintage Dresser Make-Over
Happy Monday everybody, boy fall is in the air today, just a cool 62 outside and I’m loving it, whoop, whoop! perfect weather for working in my shop…on this Vintage Dresser Make-Over.
I bought this Vintage Dresser just a couple of weeks ago at a local auction house and hadn’t really had time to give it a good-looking over. Well….when I did I saw that the damage on the sides of the dresser where basically un-fixable and they would need to be replaced.
Note to self…thoroughly inspect each piece before buying.
Have you ever done that… bought a piece then after you get it home realize it may not be something you can fix or just don’t have the expertise to restore it? I have…Â But I would not let this little dresser beat me. After all, it was a good deal and the drawers worked great, it was just the sides that needed fixed.
Now how do I get the sides off??? After pondering this thought for a while I just decided to go for it.
The sides where very flimsy. The material that had been used originally was kinda cheap. They where just glued into tracks on the sides. So after a little hammering to loosen the glue and sawing, they slid right out.
I purchased 2 pieces of particle board at Lowe’s and cut them to the exact measurements of the inside edges of the dresser. This material was much sturdier. I had to scab in some 1 x 2’s on both sides of the dresser so I could attach the new sides. Then I added a little trim around the edges to just dress it up a little. Now for the fun bit…..painting.
Joanna Gaines, Olive Grove Chalk Style Paint.
I had been wanting to try the new Joanna Gaines chalk style paint for a while and this little dresser was the perfect subject. I chose Olive Grove as the color and I’m so glad I did….I absolutely love this color. The paint is awesome….now don’t get me wrong I’m still all about Annie Sloan…..big fan….but I am always looking for new products to try.
.The JGÂ paint is not as thick as Annie Sloan chalk paint, which was great since I didn’t want too much texture. It glides on very easily and only took 2 coats cover.
After the paint was dry I applied a Dark Walnut Minwax stain, with a small brush to the molding and edges. Working one side at a time. I let the stain sit for just a minute then went over the whole dresser with the dark walnut….you’ve heard this before…wipe on, wipe off.
If you let the stain sit for too long before wiping it off it gets tacky and hard to work with. Stain is a good alternative to wax for several reasons.
- Defiantly easier to work with than wax
- A lot faster to apply
- cures and dry’s in 24 hrs.
I love the way the stain made this vintage dresser look aged You do not have to wax over the stain since the stain will seal and protect your piece.
Stain Removes Stain
One tip to remember is “stain removes stain”. So when your finished with your project and your finger nails are nasty and look like you have been playing in the dirt all day…just rub a little stain on your hands and then wash with soap and water… comes right off. Olive oil, vegetable oil or coconut oil works great too for removing stain from your hands. I always have a small bottle handy when I’m working with stain.
Now to find a new home for this vintage chest of drawers, I’m obsessed with this color, I love it. Let me know what you guy’s think.


