
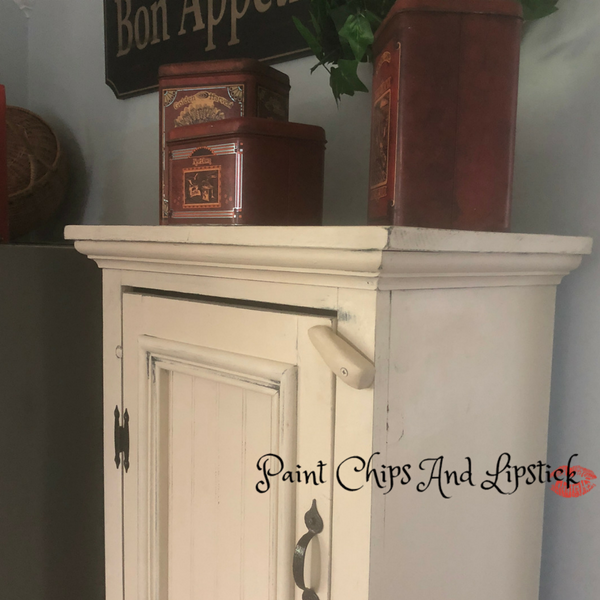
Free standing Kitchen pantry.
Who say’s you have to have a┬á kitchen Pantry the size of your refrigerator?
And…who can reach those “above the fridge cabinets” anyway? you would have to have extremely long arms or be at least 8ft tall.
Besides a free standing kitchen cabinet can be moved around, which I do…occasionally.
This free standing kitchen pantry took about 3 hours build and matches my  kitchen cabinets perfectly.

Before we get started…
I have built, over the last decade, hundreds of cabinets, cupboards, dressers…etc.
I mean literally, hundreds!. It all starts with a “not so well drawn” diagram of what I want. Then I decide on the dimensions, which usually change during the building process. It’s all very simple math, and basic construction.

What I’m trying to say is, my methods may not be “politically correct” in the realm of furniture building. However the end result is a very strong piece of furniture that will last for years…I am after all self-taught.
If you want simple, then you’re in the right place…I may even use terms like “dumer hicky”, or “thingy majig”
So…that being said, this is what you will need.
SUPPLIES
- #3 1 x 12 PINE (DECKING)
- 1 1/4″ dry wall screws
- Glue
- Luan (plywood)
- Bead Board
- Hardware
- 2″ Finish Nails
- Chalk Paint
- Wax
- Stain
- Crown Molding (optional)
TOOLS
- Table saw
- Drill
- Kreg Jig
- Hammer
- Chop Saw
- Nail Gun
- Router
This is how I figure out my cutting list. First figure out what the outside dimensions are. In this case the pantry is: H70″ x W20″ x 12″
CUT FOR BODY
- Sides 69 1/4″ x 11 1/4″ x 2
- Bottom Shelf + Shelves 18 1/2″ x 11 1/4″ x 2
- Bottom Supports 18 1/2″ x 1 1/2″ x 2
- Top Supports 18 1/2″ x 2″ x 2
- Stiles 69 1/4″ x 2′ x 2
- Top Rail 16″ x 2 1/2 x 1
- Bottom Rail 16″ x 2 1/4″ x 1
CUT. FOR BACK LUAN
- 20″ x 70″ x 1
CUT. TOP
W23″ x D13 1/2″
- 23″ x 11 1/4 x 1
- 23″ x 2 1/4 x 1
Use 3 pocket holes and glue to join the 2 pieces together

I cannot say enough about the Kreg Jig, it has made the building process so much easier and the furniture much stronger…well worth the investment.
Once all your pieces are cut, pre-drill using the Kreg Jig. I drill 3 holes at the top end of each (cabinet) side to attach the top. Also you will want to drill holes at each end of the supports and along the length.
TIP
I prefer to stain the inside of my pieces as I go…its just easier.
Lay out all your pieces and screw your bottom supports to the sides of the cabinet. Next attach the bottom shelf, then the top supports.

Glue and attach the rails and stiles then decide where you want your shelves. I pocket screw the end’s of each shelf, this allows for a very strong hold.


Now you can attach the top, I use Elmer’s Wood Glue (it’s the best I have found).
CUT.DOOR FRAME
- 64 1/4″ x 2″ x 2
- 14″ x 2″ x 3
CUT. BEAD BOARD
- L29 1/2″ x W12 1/2 x 2
Round of the corners to fit in the routed door frame.

Use pocket holes on the ends of the short pieces and glue and screw your frame together. You will need to route the inside of your door so the bead board fits snugly. I added some trim to the outside of the doors to match the kitchen cabinets, this is optional. Use 5/8″ brad nails and a nail gun and glue to attach the bead board to the back of the door.

CUT. LIP FOR BOTTOM OF CABINET
- 21 1/2″ x 1 1/2″ x1
- 12 3/4″ x 1 1/2″ x 1
45  both ends of the long piece and one end of the short pieces.

Counter sink all your nail holes and fill with Elmer’s Wood Filler. Attach the back using the 2″ finish nails. (Don’t forget to stain before you attach it)….been there, done that.
FINALLY…we get to do the fun bit…Paint.

I used Annie Sloan Old Ochra over a black under coat and clear wax to seal. Attach the hardware.

Have a great week!


